_1@2x.png)
How to Import Entries into Gravity Forms
 GravityImport is the best way to import data into Gravity Forms from a CSV.
We’re the only Gravity Forms Certified Add-On for importing entries from CSV. The easy-to-use interface makes it easy to map & import thousands of entries with data validation, input mapping, and more.
Buy now! - We guarantee it will save you time!
Watch the Video Tutorial
Here's a walkthrough of using the GravityImport plugin. With the plugin, you can import CSV files into Gravity Forms.
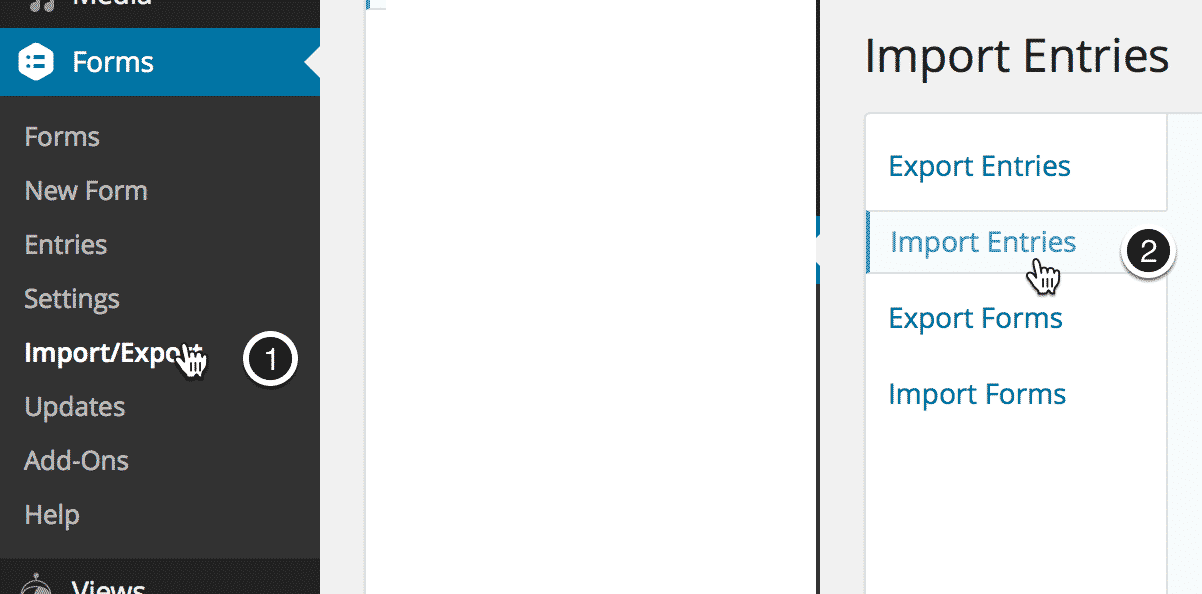
1. Go to Gravity Forms' Import/Export Page
Then click on Import Entries.
2. Drag and drop or click to upload a CSV file

3. Choose an existing form or create a new form

4. If you choose an existing form, you'll see a list of your forms
You can also search for a form by typing a form name in the search box. Click on the name of your form to proceed.

5. If you choose to create a new form, name the new form
Enter a new form name, then click the "Continue With Import" button to proceed.

6. Map fields from your CSV file to form fields
For each column in your import file, choose the Gravity Forms field you want to map it to. You can skip columns by selecting "Do Not Import" from the "Import To" dropdown. You can also create a new field during import by selecting "Add Form Field" from the "Import To" dropdown.

7. Once the mapping is complete, click the Continue With Import button

8. Configure the import settings
Once you have mapped your fields, there are some basic options to configure.

If you aren't sure what to do, you can hover over the Help icon in the lower right area of the screen.

8.1 Ignore Required Form Fields
This setting is only visible if you import data into a form with required fields. This setting will allow you to import rows from your CSV that do not contain the required fields.

8.2 Process Feeds
If your form has feeds configured, this setting allows you to trigger the feed for each imported entry. Each entry will be sent to the checked feeds. Of your feeds are configured with conditions, those conditions will be respected when processing each entry.

8.3 Continue Processing If Errors Occur
With this setting enabled, if the importer encounters a problem with the CSV, it will not stop the import. It will continue processing all the rows of your CSV file and then provide a report of the errors encountered.

8.4 Conditional Import
If you want to filter the imported entries based on their values, you can do so by using the "Conditional Import" setting.

8.5 Email Notifications
Enabling this setting will send your Gravity Forms Form Notifications for each CSV row.

9. Begin Import
Once your options are configured, click the "Continue With Import" button to start the import.

10. While you're importing, you'll see a live status
The import might take a while, but you can see what's happening while the entries are being processed

11. Import completed
After the import is complete, you'll see a detailed summary page.
11.1 If there were no errors
You'll see a message indicating that all of your entries were imported as well as a button you can click to view the imported records and another button you can click to start a new import.

11.2 If no rows were imported:
If your import resulted in no added rows, you can click the Change Field Mapping button, which will take you back to the Field Mapping screen. Click the "view log" link to see why your data was not imported.

11.3 If there were errors during the import
If there were errors with the import, you will see:
- The number of entries created, the number of errors, and a "view log" link you can click to see why an entry was not created
- A "View Imported Records" button, which will display the entries that were successfully created
- A "Change Field Mapping" button, which will take you back to the Field Mapping screen so you can change your field mappings then run the import again
- A "Start New Import" button, which will allow you to run another import
