_1@2x.png)
GravityImport: Preparing Your CSV for Import
⚠️ This guide is for earlier versions of the GravityImport plugin (versions 1.x). The information provided here doesn't apply to the newest versions (version 2.x).
If you exported entries from Gravity Forms, you would not need to modify the formatting. The details below include additional information and formatting CSV files when importing from other data sources.
All CSVs require a header row. A header row is one row with labels defining the content for each column of data. To enable header rows in Excel, read this article.
Formatting details:
- Text Fields (Text, Paragraph, Number, Hidden)
- Fields with Options (Checkbox, Drop Down, Radio, Multi Select)
- Entry Details (Entry ID, status, User IP, etc)
- Product Option Fields
- Post Fields (Title, Body, Tags, Etc.)
- Name
- File Upload Field
- List Field
- Date Field
- Time Field
- Phone Field
- Entry Notes
- Not Implemented Yet…
Text Fields
- Single Line Text Field
- Paragraph Text Field
- Number Field
- Hidden Field
These fields support "free text", which can be values saved as plain text.
Formatting notes:
- Number fields must be numeric
- Maximum Characters field settings are currently ignored
Pre-Defined Text
Imported values must match the text of the option exactly.
For these fields, if the field has the "show values" checkbox checked, make sure that the imported text matches the "Value" values, not the "Label" values.


Single Values
- Radio Buttons Field
- Drop Down Field
Only one value may be imported.
Example
Apple
Multiple Values
- Multi Select Field
- Checkboxes Field
Multiple values may be imported, separated by commas.
Example:
Apple,Orange,Pears
Will import the "Apple", "Orange", and "Pears" options.
Apple,Pears
Will import the "Apples" and "Pears" options.
Apple,Banana,Pears
Will import the "Apples" and "Pears" options, because the Banana option does not exist for the field.
Name Field
When mapping a Full Name, Prefixes ("Dr", "Ms", "Mr", etc) are not currently supported.
File Upload Field
Single Upload
Single uploads should be the full URL to the file.
Example:
http://example.com/my-pretty-pony.png
Multiple Uploads
Multiple uploads should be formatted as a JSON array, without escaping slashes before the / character.
Example:
["http://example.com/my-pretty-pony.png","http://example.com/my-pretty-kitty.png","http://example.com/my-pretty-doggy.png"]
List Field
Single Column Lists
Single column lists should have its values separated with a vertical pipe: |:
Item 1|Item 2|Item 3
Multiple Column Lists
If your field is named "Multiple Lists" for example and it has three columns, we suggest you create three columns on your CSV file and during the import process, map each one of these CSV columns to a column of your Multiple Lists field.

The CSV file with only one record:
Single List, Multiple Lists 1, Multiple Lists 2, Multiple Lists 3
Gravity|View,First Choice|3.2|3.3,Second Choice|4.2|4.3, Third Choice|5.2|5.3
Here's how the mapping will look like:

The result:

Known issues with Multiple Column Lists
- In Gravity Forms, the Field columns must have labels. If the column labels are empty, the values will not be properly stored
Date Fields
yyyy-mm-dd is a date format you can always use, but you can also format the date based on the Date Format of the target Date field. Make sure the Gravity Forms field's Date Format matches your chosen format.
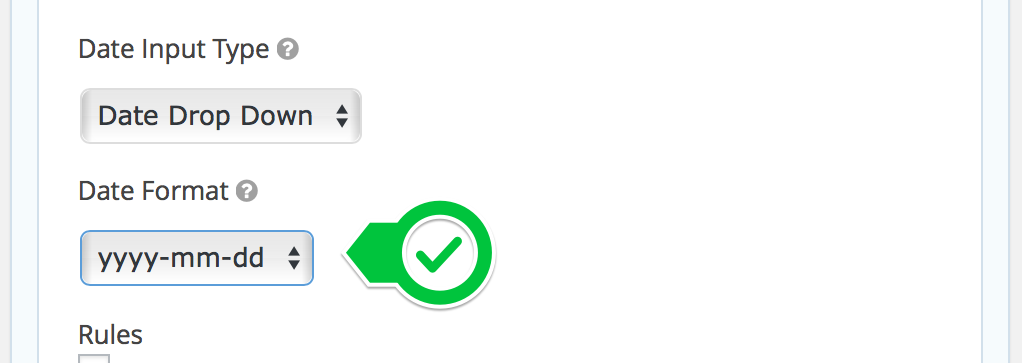
Below are how "November 17, 2013" would be formatted based on default Gravity Forms date formats:
mm/dd/yyyy=>11/17/2013dd/mm/yyyy=>17/11/2013dd-mm-yyyy=>17-11-2013dd.mm.yyyy=>17.11.2013yyyy/mm/dd=>2013/11/17yyyy-mm-dd=>2013-11-17(preferred)yyyy.mm.dd=>2013.11.17
Time Fields
You must use two digits for hours and minutes, you can't use a single number for hours. Example: 9:00 is invalid; use 09:00 instead.
If the "Time Format" is 24 hour:
The field should have Hours and Minutes, separated by a colon ::
HH:MM
If the "Time Format" is 12 hour:
The field should have Hours and Minutes, separated by a colon :, then a space and AM or PM:
HH:MM AM
Phone Fields
If the Phone Field is using the US/Canada format, the validation will check for (###) ###-#### phone number formats:
(800) 555-1212
If using the International setting, no validation occurs. If you encounter any import issues, you may want to consider updating your form to use International phone number format during import.
Entry Notes
Entry notes can be added to imported rows. The notes can be formatted as plain text, or as a JSON array of multiple notes.
Plain text example: This person has been amazing to work with.
JSON example:
["Called client on June 23 - went well.", "July 4, they were on vacation. I left a message.", "August 12, they send me a pony!"]
You can also specify the user to assign to the notes by mapping the "Entry Note Creator" dropdown. This should be the ID of the user to assign the note to. Otherwise, the note will default to being created by the currently logged in user.
Post Fields
Post ID
If the Post ID is mapped to be imported, the import will attempt to update an existing post with that ID. If a post with that Post ID does not exist, none of the post fields will be processed.
If a Post ID is not mapped, then a new post will be created.
Post Image Field
Post Image data should have values separated by |:|, in the following order:
- File URL (required)
- Image Title
- Image Caption
- Image Description
Example format:
http://example.com/my-pretty-pony.png|:|My Pretty Pony|:|This is my pretty pony running in a field|:|What a wonderful day I had with my pony. The field was so green!
If a value is empty, you should still include the separator if there is another value after it. In this example, we only want to include the File URL and the Image Description. Note the additional separators:
http://example.com/my-pretty-pony.png|:||:||:|What a wonderful day I had with my pony. The field was so green!
Post IDs
If you are passing a Post ID to the importer, the post must exist on the site. If not, the entry will not be created.
Post Tag Field
Post tags should be formatted with tags separated by commas.
Tag 1,Tag 2,Tag 3
Post Category Field
Post categories should be formatted as a JSON array, with the ID of the category as the value.
13, 39, 27
Product Option Fields
Since Version 1.4
Note: If importing a Gravity Forms export file, you won't need to modify anything.
Multiple Options at once ("Multiple")
To import multiple options at once, map your data column to the Option field that has (Selected) added to the end of the Option field name.
By default, Gravity Forms exports options as their own column. You can map each Option individually, or you can import multiple Options at once by mapping with the field's "(Full)" field.
If you want to set multiple options at once, separate multiple Choice Labels or Choice Values with commas.
This entry will be imported with all three Option Choices selected:
First Choice,Second Choice,Third Choice
This entry will be also imported with all three Option Choices selected:
First Value,Second Value,Third Value
Just as with the Single Choices, you can override the prices that are set in the form by setting your own:
First Choice|49.99,Second Choice|99.99,Third Choice|129.99
Note: If you have commas in your Choice Label or Choice Value, make sure to add a backslash before each comma, like this: ( \,)
First Choice\, with Comma,Second Choice no Comma,Third Choice no Comma
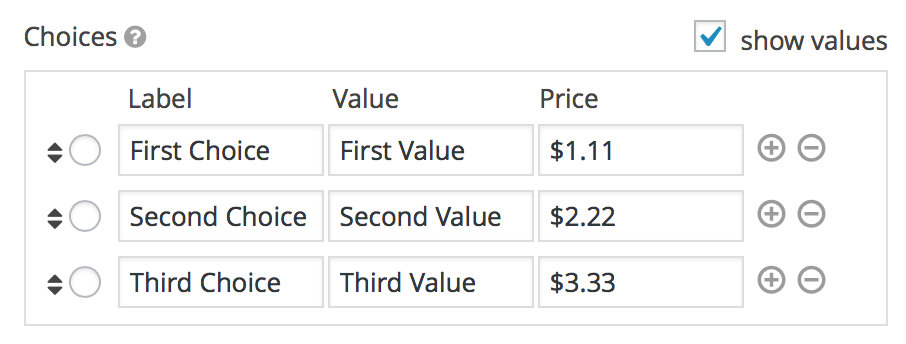
Single Option Choice (Default)
The data must match the Choice Label for the Option you are importing. If the "show values" checkbox is selected, you can also use the Choice Value.
For the example, both First Choice and First Value will work. If empty, the Option will not be selected. You can override the price using "Overriding Option Prices" format below.
First Choice
Overriding Option Prices
When you are overriding prices that are set in the form, you will need to use the following format:
{Option Label or Option Value}|{Option Price}
If you have an Option with a label of "First Option", a value of "First", and a price of $15.00, it would be formatted like First|15.00 or First Option|15.00. The separator is a vertical pipe bar | character.
Entry Details
Entry ID
Since Version 1.1
Specify an Entry ID number, and the Importer will update an existing entry, if found. If an entry is specified but not found, there will be an error. If empty, a new entry will be created.
When doing this, the existing entry will be completely overwritten—nothing will remain of the original entry. So make sure you have a backup and are completely aware of the risks of overwriting entries. If possible, we recommend adding new entries and deleting old ones. You have been warned!
Other Entry Details
- Entry Status: The current status of the entry. Valid options are:
active,spam, andtrash - User Agent: Provides the name and version of both the browser and operating system from which the entry was submitted. Example:
Mozilla/5.0 (Macintosh; Intel Mac OS X 10_10_3) AppleWebKit/600.5.17 (KHTML, like Gecko) Version/8.0.5 Safari/600.5.17. Note: If blank, the Entry Importer will add a custom User Agent to identify the entry as being imported by the plugin. - Is Read: Indicates if the entry has been read. Set value to
1for entries that are read and0for entries that have not been read. - Is Starred: Indicates if the entry has been starred (i.e marked with a star). Set value to
1for entries that are starred and0for entries that are not starred. - User IP: Client IP of user who submitted the form.
- Source URL: Source URL of page that contained the form when it was submitted.
Fields Not Implemented Yet
These field types have not yet been added to the Importer. We're working on adding support for these.
- Coupon Fields
- Signature Fields